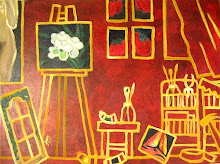
Support (paper, board, canvas, etc.) is very important in painting in oil pastel. It must have a "tooth" so that the colors stick well to it. By preference, I use black #120 sandpaper. I also use watercolor paper, especially my failed watercolors so that I could still make use of the textured paper which is quite expensive to just throw away. Since sandpapers come in standard 9"x11" cuts or by meters but still 11" in width, I also make my own homemade sandpaper.
Although I have a high regard for the discipline, patience, and so much time spent on it, realism or photorealism is just not my style. I don't use a pantograph to copy the exact proportions of a face or body.
My favorite subjects are everyday people in their usual habits. That way, the pose is more relaxed and not self-conscious. I tend to leave the faces blank because my audience can already tell who my subject is just by the shape of their bodies. Adding facial features that may turn out wrong will only ruin the fun of the guessing game.

My procedure is to paint from dark to light, background first, although there are instances when this is not the case.
First, I sketch on sandpaper using a color I would use for the background so that it would blend later on when I color. Sometimes, I would also choose a pastel stick I rarely use like orange, pink, or apple green so that they will serve their purpose. Then I color in the colors, starting with the midtones.

Second, I color in the darker colors or darker tones. That way, shadowy areas in the painting gets "thrown back" into the painting such as the eye sockets, the mouth, and the deep forest behind the subject.
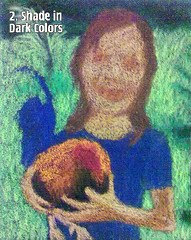
Third, I shade in the darkest tones to really throw deeper into the painting the shadowy areas. In the meantime, the work in progress has a spooky look. Some artists I know would rather go for the gothic look. But no matter how I try to paint weird, despite my angst, my "wild" paintings often come out lame, so I guess that's just not my style, and a realization that I still am a happy spirit after all.

Fourth, I shade in the light tones using hatching, feathering, and glazing strokes.

Fifth, I put highlights to lift areas that should be contoured. Doing highlights on the face is just like putting makeup -- shadows, blush, and highlight. In my smaller figures I really leave the faces blank but since this piece has a larger subject, I am compelled to add just a hint of details on the face. However, I think I put too much highlight on the upper lip so that the mouth looks like pouting out when it should not. Then I decided to work the eyes a little bit but they turned out to be a disaster because the caucasian eyes became chinky with just a few flicks of color. Since I use the blunt end of the pastels as well as the sides thus coming up with rough, loose effects, just a teeny-weeny stroke could alter the look of the subject. Notice that I already signed my name on the artwork but it doesn't mean that I'm done with it as I still have something to give to it. And I need not worry because pastels, like oils and acrylics, are easy to correct -- you just have to paint over the areas that need correction.

Sixth, I incorporated my corrections such as the mouth by lessening the highlight on the upper lip and widening the smile by smudging in more black. I added more strands to thicken the hair and I also added more blue on the shirt sleeve and more skin tone to make the arm a little less skinnier.
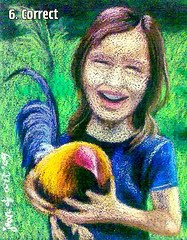
Exhausted after three hours of working on this particular piece, I felt I was already spent. I cannot give anything more to it, and so it is truly finished.
I call this painting "Talisayon Talisaynon" because the breed of game fowl is Talisayon and the girl holding it is a tru-blu Talisaynon (a native of Talisay City, Negros Occidental, Philippines) whose heart she declares will always belong in her native country inspite of her new home in Manchester, England.


No comments:
Post a Comment